JSDoc is a popular tool for generating documentation from comments in the source code of your app. This serves two purposes. First, the documentation is directly available to anyone viewing the source code. Second, the comments can be compiled later into a complete set of reference documentation.
Swagger provides a tool for presenting this documentation: Swagger UI. Swagger UI creates a web page from OpenAPI Specification definitions. As this tutorial will show, these definitions can be written in YAML directly in JSDoc comments.
In this tutorial, you will set up a Swagger UI documentation web page for an Express API. You can then write JSDoc comments in your API's source code to generate the OpenAPI definitions. By the end, you will have documentation that follows the OpenAPI Specification, presented from a custom /docs endpoint added to your Express API:

Prerequisites
To complete this tutorial, you'll need
Familiarity with REST APIs and Express
Node.js installed on your system
An Express-based REST API running on a local Express server. If you don't have one, you can install the Express API used in this tutorial. It retrieves user data from JSONPlaceholder.
To install and run the sample Express API, first clone the repository (replace test-api with the directory name of your choosing):
git clone https://github.com/kabartolo/jsonplaceholder-express-api test-api
Next, run the following commands to start the Express server (replace test-api with the name of the directory you just created):
cd test-api
npm install
npm run start
Navigate to localhost:3000 to see the API. You should see links to /users and /users/1.

Navigate to either of these to see user data from JSONPlaceholder.
The code added during this tutorial can be found in the repository's docs branch.
Terminology
OpenAPI is the name of the specification, while Swagger is the set of tools that implement this specification. See What Is the Difference Between Swagger and OpenAPI?
This tutorial uses the following API-related terms and definitions defined by OpenAPI:
    https://api.example.com/v1/users?role=admin&status=active
    \________________________/\____/ \______________________/
             server URL       endpoint    query parameters
                                path
-
Server URL or base URL: The base URL for all API endpoints:
localhost:3000orexample.com/api -
Endpoint path: The path representing the location of the resource (relative to the base URL):
/usersor/users/1 - Operation: The HTTP method used to manipulate endpoint paths: GET, POST, PUT, DELETE
- Resource: Information representing a real-world object (e.g., a user or book), usually returned by the API as JSON data. Represented by a database model in Express.
The full URL used to retrieve data from the API is formed by adding the endpoint to the base URL: localhost:3000/users.
Step 1: Set up the application
1.1: Install swagger-jsdoc and swagger-ui-express
To create a Swagger UI page from JSDoc comments, you’ll need a way to pass your documentation to Swagger UI:
-
swagger-jsdocgenerates OpenAPI definitions from JSDoc comments. -
swagger-ui-expresscreates the Swagger UI page from these definitions.
To install swagger-jsdoc and swagger-ui-express to your Express API, run
npm install swagger-jsdoc@5.0.1 --save-exact
npm install swagger-ui-express --save
This tutorial uses
swagger-jsdocversion5.0.1. The latest version might not be compatible with this tutorial.
1.2: Create an API specification
Swagger UI creates a docs page from a set of OpenAPI definitions. These definitions are written in YAML or JSON to describe a REST API. For more information on the basic structure of the OpenAPI Specification, see Basic Structure.
In your Express API's app.js file, add the following code below the list of required modules:
// app.js
const swaggerJSDoc = require('swagger-jsdoc');

const swaggerDefinition = {
  openapi: '3.0.0',
  info: {
    title: 'Express API for JSONPlaceholder',
    version: '1.0.0',
  },
};

const options = {
  swaggerDefinition,
  // Paths to files containing OpenAPI definitions
  apis: ['./routes/*.js'],
};

const swaggerSpec = swaggerJSDoc(options);
The swaggerDefinition object (i.e., the OpenAPI definition) defines the root information for your API. Provide a few basic pieces of information to the swaggerDefinition, such as the title and version of your API; you can fill in more later.
The options object contains this swaggerDefinition object and an array of paths called apis. These are paths to files containing other OpenAPI definitions. These file paths should be relative to the root directory of your Express API. In our case, definitions will be written in JSDoc directly in the /routes files. You can list the filenames individually or use the wildcard delimiter * to add all JavaScript files in a directory, as shown above.
The options object is used by swagger-jsdoc to produce an OpenAPI specification in a variable called swaggerSpec. This specification is equivalent to the swagger.json or swagger.yaml file normally used by Swagger UI to create a docs page. You'll pass this object to Swagger UI in the next step.
Restart the Express server to ensure there are no errors. If you get any errors at this stage, check that your swagger-jsdoc version is 5.0.1 exactly.
1.3: Create the Swagger UI docs page
To create a Swagger UI page for your Express API, include swagger-ui-express in the app.js file. Then, add an endpoint path called /docs (or any name of your choosing):
// app.js
// ...
const swaggerJSDoc = require('swagger-jsdoc');
const swaggerUi = require('swagger-ui-express');

// ...

var app = express();

app.use('/docs', swaggerUi.serve, swaggerUi.setup(swaggerSpec));
As shown above, swagger-ui-express provides two callbacks to set up the endpoint: one to set up Swagger UI with the swaggerSpec definitions and one to serve it to the /docs endpoint.
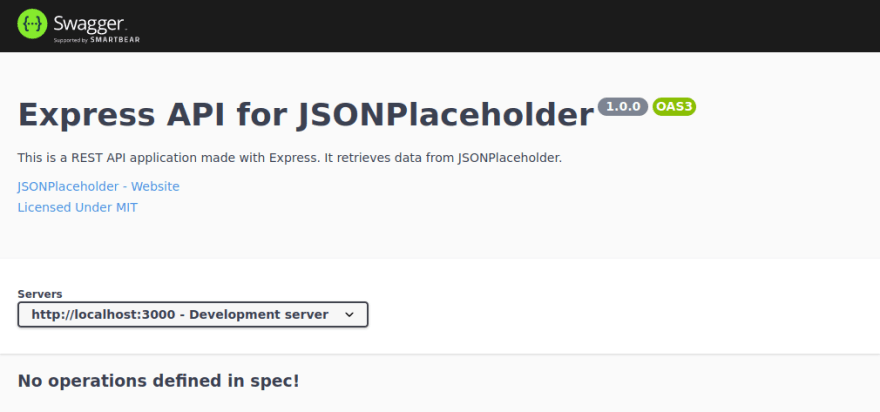
Restart the Express server, and navigate to localhost:3000/docs in the browser.
You'll see the title and version number of your Express API, as well as the OpenAPI version number (3.0.0). Since we have no other definitions yet, you'll see a "No operations defined in spec!" message:

You now have the start of a beautiful docs page for your API! The rest of this tutorial provides a basic introduction to OpenAPI definitions.
Step 2: Define your API's root information
You've created a Swagger UI docs page, and you're set to start writing docs. But first, you should add more root definitions for the API.
Return to app.js. Note that the info object maps to OpenAPI's Info Object to define a title, description, list of servers, contact information, and list of paths for your API.
Here is an example of a more complete definition:
// app.js
const swaggerDefinition = {
  openapi: '3.0.0',
  info: {
    title: 'Express API for JSONPlaceholder',
    version: '1.0.0',
    description:
      'This is a REST API application made with Express. It retrieves data from JSONPlaceholder.',
    license: {
      name: 'Licensed Under MIT',
      url: 'https://spdx.org/licenses/MIT.html',
    },
    contact: {
      name: 'JSONPlaceholder',
      url: 'https://jsonplaceholder.typicode.com',
    },
  },
  servers: [
    {
      url: 'http://localhost:3000',
      description: 'Development server',
    },
  ],
};
If you have a production server, add the URL and a description to the servers list. See Basic Structure for more information on the other properties you can add to the root definition.
In the OpenAPI docs, you'll notice there's also a paths field. You won't need to specify the path definitions here, since each path is defined separately in a JSDoc comment (to be added in the next step). These path definitions are compiled by swagger-jsdoc into a paths object for you.
Restart the Express server, and navigate again to localhost:3000/docs in the browser. You should see more information about your API at the top of the docs page:
You can now start documenting your Express routes.
Step 3: Write the docs
With a Swagger UI docs page available at the /docs endpoint and a complete set of root information on your API, you can start writing your path definitions. Each path definition corresponds to an Express route in your API. It describes both the operation and endpoint path, such as GET /users and DELETE /users/:id.
3.1: Document the routes
To document /routes/users.js, first add a comment starting with @swagger above the first route. Follow this with some basic information about the route:
// routes/users.js

/**
 * @swagger
 * /users:
 *   get:
 *     summary: Retrieve a list of JSONPlaceholder users
 *     description: Retrieve a list of users from JSONPlaceholder. Can be used to populate a list of fake users when prototyping or testing an API.
*/
router.get('/', function(req, res) {
  //...
});
Note that swagger-jsdoc looks for comments with a @swagger or @openapi tag to create OpenAPI definitions.
As shown in the code example, add the endpoint path /users and the operation get (indented two spaces). The path in the Express router function get('/') is relative to /users, so the path in the definition should be /users.
The summary should be a brief description of the goal of this route. The description should provide more detail, such as when or why you would want to use the route.
Be sure to use two spaces (or four spaces) for indentation, not tabs. Refer to YAML Syntax for more information.
Restart the Express server, and navigate again to localhost:3000/docs in the browser. You should see a listing for GET /users near the bottom of the page:

3.2: Document responses
Your users will want to know what is returned when this GET request is successful (i.e., with a status code of 200). To define a successful response, add a responses object and a response called 200 to the path definition:
// routes/users.js

/**
 * @swagger
 * /users:
 *   get:
 *     summary: Retrieve a list of JSONPlaceholder users.
 *     description: Retrieve a list of users from JSONPlaceholder. Can be used to populate a list of fake users when prototyping or testing an API.
 *     responses:
 *       200:
 *         description: A list of users.
 *         content:
 *           application/json:
 *             schema:
 *               type: object
 *               properties:
 *                 data:
 *                   type: array
 *                   items:
 *                     type: object
 *                     properties:
 *                       id:
 *                         type: integer
 *                         description: The user ID.
 *                         example: 0
 *                       name:
 *                         type: string
 *                         description: The user's name.
 *                         example: Leanne Graham
 */
router.get('/', function(req, res) {
  //...
});
The description field describes the response or what it returns. The content field describes the content type (application/json), and the schema describes the response object. In our case, JSONPlaceholder returns an object with a data field, which contains the data you've requested. For this response, data contains an array of user objects. Add just one or two user properties (e.g., id and name) to avoid cluttering the file for now.
Add a real example value for each property (e.g., 'Leanne Graham'); otherwise, Swagger UI creates a generic example such as 'string'.
Notice how the types are defined in this schema. For example, to define an array, add
type: arrayand anitemsfield. Read more about types in the Data Types documentation.
You can also describe error responses this way. See Swagger's Describing Responses documentation for more details on the fields available for describing each response.
Restart the Express server, and navigate again to localhost:3000/docs in the browser. You should see the response, an example value (using the example values you provided for each property), and the schema for the data returned in this response:

Next, define the GET /users/:id path by adding the fields we've covered already (summary, description, and responses):
// routes/users.js

 /**
 * @swagger
 * /users/{id}:
 *   get:
 *     summary: Retrieve a single JSONPlaceholder user.
 *     description: Retrieve a single JSONPlaceholder user. Can be used to populate a user profile when prototyping or testing an API.
 *     responses:
 *       200:
 *         description: A single user.
 *         content:
 *           application/json:
 *             schema:
 *               type: object
 *               properties:
 *                 data:
 *                   type: object
 *                   properties:
 *                     id:
 *                       type: integer
 *                       description: The user ID.
 *                       example: 0
 *                     name:
 *                       type: string
 *                       description: The user's name.
 *                       example: Leanne Graham
*/

router.get('/:id', function(req, res) {
  //...
});
Here, the path parameter (id) is added to the endpoint path: /users/{id}. Curly brackets ({}) are used to mark a path parameter in the endpoint path. Note that the colon style (/users/:id) won't work with Swagger (thanks @sherwinwater for pointing this out!).
The data object in this schema contains a single user object instead of an array of user objects, but the properties are the same.
Next, define POST /users by adding the fields we've covered already (summary, description, and responses):
// routes/users.js

/**
 * @swagger
 * /users:
 *   post:
 *     summary: Create a JSONPlaceholder user.
 *     responses:
 *       201:
 *         description: Created
 *         content:
 *           application/json:
 *             schema:
 *               type: object
 *               properties:
 *                 data:
 *                   type: object
 *                   properties:
 *                     id:
 *                       type: integer
 *                       description: The user ID.
 *                       example: 0
 *                     name:
 *                       type: string
 *                       description: The user's name.
 *                       example: Leanne Graham
*/
router.post('/', function(req, res) {
// ...
});
A successful response in this case would be 201. It returns an object with a data field containing the new user.
You can continue adding path definitions for the remaining routes in the same way. We'll do some refactoring in a later step.
Restart the Express server, and navigate again to localhost:3000/docs in the browser. You'll now see a listing for GET /users/{id}, POST /users, and any other path definitions you've added:
3.3: Document the requests
Request data such as parameters and request bodies can also be documented in your OpenAPI definitions. For example, GET /users/:id has an id parameter, which should be documented.
To document parameters, add a parameters field to the path definition:
// routes/users.js

/**
 * @swagger
 * /users/{id}:
 *   get:
 *     summary: Retrieve a single JSONPlaceholder user.
 *     description: Retrieve a single JSONPlaceholder user. Can be used to populate a user profile when prototyping or testing an API.
 *     parameters:
 *       - in: path
 *         name: id
 *         required: true
 *         description: Numeric ID of the user to retrieve.
 *         schema:
 *           type: integer
 *     responses:
 *       200:
 *         ...
 */
router.get('/:id', function(req, res) {
  //...
});
In the definition for this parameter, in defines the parameter's location (in this case, it's a path parameter because it's part of the path). You can also add a name, description, and schema and whether the parameter is required. See Describing Parameters for more details.
Restart the Express server, and navigate again to localhost:3000/docs in the browser. You'll see a list of parameters for this route:

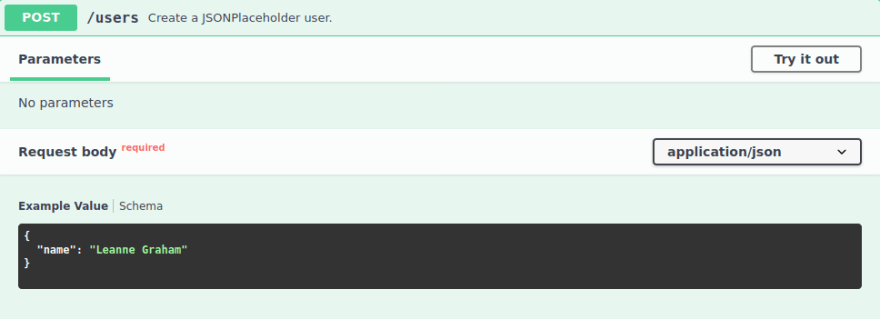
Next, document the request body for POST /users to describe the data required to create a new user in the database. To do this, add a requestBody field to this path definition:
// routes/users.js

/**
 * @swagger
 * /users:
 *   post:
 *     summary: Create a JSONPlaceholder user.
 *     requestBody:
 *       required: true
 *       content:
 *         application/json:
 *           schema:
 *             type: object
 *             properties:
 *               name:
 *                 type: string
 *                 description: The user's name.
 *                 example: Leanne Graham
 *     responses:
 *       201:
 *         ...
*/
router.post('/', function(req, res) {
// ...
});
This adds a request body schema to this path definition. This example shows that name can be sent in the request body. You can add more properties for new users later. See Describing Request Body for more details.
Restart the Express server, and navigate again to localhost:3000/docs in the browser. You'll see a section called Request body with the schema you've provided:
3.4: Document the resources
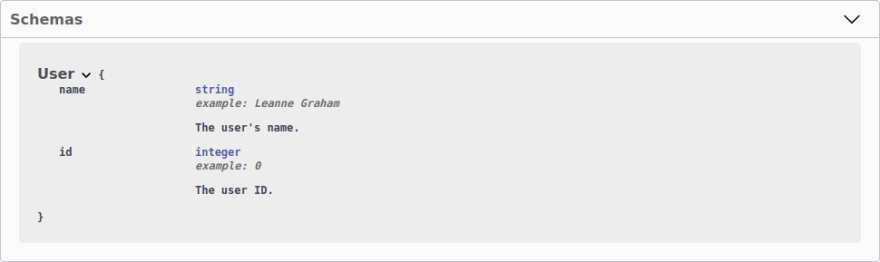
You might have noticed you've repeated the user schema several times in the documentation so far. To avoid this duplication, you can define the user schema in one place and reference it from elsewhere.
Each model defined by your Express API can be documented separately as a schema definition (or component). To do this for the user model, add a User schema definition to the top of the file, under components/schemas:
// routes/users.js

/**
 * @swagger
 * components:
 *   schemas:
 *     User:
 *       type: object
 *       properties:
 *         id:
 *           type: integer
 *           description: The user ID.
 *           example: 0
 *         name:
 *           type: string
 *           description: The user's name.
 *           example: Leanne Graham
 */
You can then reference this schema definition using $ref:
// routes/users.js

/**
 * @swagger
 * /users:
 *   get:
 *     summary: Retrieve a list of JSONPlaceholder users
 *     description: Retrieve a list of users from JSONPlaceholder. Can be used to populate a list of fake users when prototyping or testing an API.
 *     responses:
 *       200:
 *         description: A list of users.
 *         content:
 *           application/json:
 *             schema:
 *               type: array
 *               items:
 *                 $ref: '#/components/schemas/User'
 */
router.get('/', function(req, res) {
  //...
});
The $ref path uses JSON Reference notation. The # symbol indicates the root of the current document, and the remaining nested values are then resolved in order. For more information, see Using $ref.
Restart the Express server, and navigate again to localhost:3000/docs in the browser. Your path definitions will now use this User schema, and you should see a schema definition for User at the bottom of the page:
Similarly, you can define a NewUser object to reference in the POST /users request body. Since it contains some but not all of the fields from the User schema, you can also use $ref to avoid duplication between them:
/**
 * @swagger
 * components:
 *   schemas:
 *     NewUser:
 *       type: object
 *       properties:
 *         name:
 *           type: string
 *           description: The user's name.
 *           example: Leanne Graham
 *     User:
 *       allOf:
 *         - type: object
 *           properties:
 *             id:
 *               type: integer
 *               description: The user ID.
 *               example: 0
 *         - $ref: '#/components/schemas/NewUser'
 */
The allOf keyword combines model definitions, in this case the NewUser definition (containing the name property) and an object with an id property. See oneOf, anyOf, allOf, not for more details.
You can now reference NewUser from the request body definition for POST /users:
/**
 * @swagger
 * /users:
 *   post:
 *     summary: Create a JSONPlaceholder user.
 *     requestBody:
 *       required: true
 *       content:
 *         application/json:
 *           schema:
 *             $ref: '#/components/schemas/NewUser'
 *     responses:
 *       201:
 *         ...
*/
router.post('/', function(req, res) {
  // ...
});
Restart the Express server, and navigate again to localhost:3000/docs in the browser. You'll see your NewUser schema in the request body definition for POST /users:

This covers the basic techniques for producing OpenAPI definitions in JSDoc comments.
Conclusion
You are now set up to produce a complete reference documentation page for your Express API. You've created a basic set of OpenAPI definitions and a Swagger UI page that displays them. If you want more practice with the OpenAPI Specification, you can finish documenting the jsonplaceholder-express-api.
This tutorial has also covered the basics of writing OpenAPI definitions. To complete your documentation, consult the OpenAPI Specification and the Swagger Docs.
To see a version of the jsonplaceholder-express-api that includes all the code added during this tutorial, see the repository's docs branch.